How to avoid being scammed

Wise words on Reddit’s r/Scams:

You cannot authenticate incoming callers, incoming email, incoming texts.  

Please remember this and your probability of being scammed with drop two orders of magnitude.  

https://www.reddit.com/r/Scams/comments/1anvpro/comment/kpv7rrw/?utm_source=share&utm_medium=web2x&context=3

Goes with the over 30 year old comic “On the Internet, nobody knows you’re a dog” (ref)

Working a bit in cybersecurity (just for fun, not for work), this seems obvious as that’s why mTLS is a thing and a necessity in some areas like IoT, but in real life the same principle applies: anyone can say they are anyone else, but many identification methods are not secure at all. Yet for many people they seem to trust those: incoming phone number (easy to fake), messages from instant messaging (might be the correct account, but not the correct person), email senders (easy to fake).

I wonder if the best fix is to educate everyone, to fix the systems, or replace them with trustworthy systems. None of those are easy and some are impossible. But educating I can do. At least some.

Migrating to 2FAS

With Passkeys being the password-replacement-of-choice (secure, MITM-attack-resistant, convenient), it’s time to review the alternatives:

  • SMS/Phone
  • Email
  • Backup Codes
  • TOTP

SMS/Phone

Known to be a problem since it’s possible to get a new SMS issued with your phone number. While I assume that most phone providers are careful, this is not in your control and it has happened.

Email

Similar to SMS/Phone, but even less secure, but you have more control here: enable 2FA to secure your email account. If this is GMail, enable 2FA. Do not use Recovery email unless that one is using 2FA too.

Backup Codes

Often consists of a long string of digits/characters or several words. Supposed to be stored offline. Risks are: recovery codes stored online (and you don’t have access to the account to read the recovery codes), forgetting where you kept the physical printout, losing the physical printout, or requesting a new recovery code and not updating the old one.

Can be only used once, so it’s really used to recover an account. That unfortunately means that it’ll likely never be used. And you cannot even test it in most cases.

TOTP

Pretty safe if kept offline. The seed can be stored offline, e.g. in shape of a printed QR code for convenience.

However TOTP is often available as the only 2FA method (ignoring SMS and email), so contrary to Backup Codes, you might want to have it available on your phone. Which makes it an online thing. Splitting account into regular-use-TOTP and exceptional-use-TOTP is an option, but it means more work to keep up-to-date.

While the usual suspects Google Authenticator, Microsoft Authenticator, Auth0 Guardian, etc. are probably well-written, I don’t like the thought that my Google TOTP is on the Google Authenticator. On the other hand, I like the cloud synchronization as I have several mobile devices, but it would be nice to disable cloud sync on some devices. “Offline-lite” if you like.

I used Google Authenticator and it worked well: it’s cloud synchronized, but you can be offline too on another phone. But at over 20 TOTP entries, it’s cumbersome to find the code you need. Sorting is manual too.

Enter 2FAS: it’s like Google Authenticator, but better:

  • Can group TOTP entries together (e.g. “Social Networks” or “Dev Stuff”) making the overall look much cleaner
  • Sort manually or alphabetically
  • Cloud sync which can be turned on/off
  • Local storage of your seeds file possible
  • Nice icons for each entry! Helps a lot to find the one you need.

Basically it has some extra features and all of those I like, and it’s open-source.

Migration Process

Google Authenticator can export up to 10 entries at a time with a large QR code. 2FAS can import it. If you have more than 10 entries, then do the next 10 after the first 10. Repeat until completed. Once done, you can export all entries at once, so this is a one-time-action.

To avoid using potentially the wrong tool for TOTP I removed all entries in the Google Authenticator app after confirming that 2FAS shows the same codes. Then it was time to uninstall Google Authenticator.

Creating folders in 2FAS took me a while to find out: click on the 3 vertical buttons on its main app screen, then create folder. Now long-press each item and you can assign them to any existing folder.

Identiv uTrust FIDO2 NFC+ Security Key (USB-C): Lacking Linux Support

I was looking for a USB-C NFC enabled FIDO2 key which also works as a SmartCard (AKA PIV mode). The Yubikey 5C NFC is known to work, but the Identiv uTrust FIDO2 NFC+ does (on paper) the same and costs half even after importing from US (via amazon.com). It’s a bit thicker, but generally comparable to the similar Yubikey.

And given that the old Yubikey Neo works well with OpenSC’s pkcs11-tool, I did not expect any issues with the uTrust key…

Well, I was wrong.

On Windows, using the Identiv’s uTrust Key Manager Software I can see that there’s PIV available and I can set PIN, PUK and a management key (same as Yubikey), and create/import certificates.

However on Linux the key is not recognized as PKCS#11 compatible SmartCard. I’d need a module as the default opensc-pkcs11.so does not work, but I cannot find one and Identiv does not seem to have one available (unlike Yubico). To make it worse, this uTrust FIDO2 NFC+ key is rare enough that this is not a common problem which would usually thus be a solved problem.

Ah well…it works as FIDO2 key, it has NFC, it has USB-C. That’s the main reason I wanted this. The PIV mode would have been nice.

Let’s see if Identiv has a usable support service to answer the question how to use PIV under Linux.

Update from 2023-08-13: No reply from Identiv. FIDO2 works on Windows and Android. On Linux it’s a bit different: the libfido2 tools work (thus they recognize the FIDO2 part just fine), but browsers Firefox (v115) has issues: the key is either not recognized at all, or I get the request for the PIN, and then it fails. NFC works reliably though (on my Android phone), and Chrome on Linux works too.
All-in-all, I do not recommend the NFC+ model as PIV totally does not work on Linux. If the choice is between the uTrust NFC (without plus) model or a Yubikey, I’d pick the Yubikey: it’s thinner and better supported on Linux.

Firefox on Android and Custom Root-CA

At home I run my own small Certificate Authority (CA) via the fabulous Smallstep step ca. Importing the root certificate is not always straightforward, but in most cases it’s sufficient to let the OS know about a trustworthy CA. Firefox on Android however does not use that OS maintained root CA repository. To enable it you need to do several things:

  • Open Firefox on Android
  • Go to Settings
  • Scroll down, click on About Firefox
  • Touch the logo 7 times to enable Developer Mode
  • Go back
  • Now you have more entries, namely the “Secret Settings”
  • And there’s the “Use 3rd party CA certificates” which is the Android maintained one
  • Turn it on

Easy, but not intuitive at all. Now I can access the web interface of my Minio Server via https as it should be.

step-ca stopped!

I am using step-ca for over 2 years now on a small little NanoPi R2S (1GB RAM). And I am monitoring it too, e.g. for the last 6 months memory is very stable and more importantly: not increasing over time. Memory leaks are real, but not on this baby:

At the very end it’s changing, and it’s changing very suddenly too. Here the last 7 days:

What did not work:

  • Reset the server
  • Reboot the server

Actually it worked for less than a minute. By then memory exhaustion happened and the server was busy swapping. Connecting via ssh became a gamble at this point.

After a reboot there’s about 1min time to stop step-ca. A simple kill won’t do because systemd would restart it, so a

systemctl stop step-ca

did the job. Just have to be fast enough to execute it.

What happened?

It seems that the internal DB (BadgerV2), which by default is in ~/.step/db/ increased over time to much that its management consumed rather suddenly so much memory that swapping happened. One parameter I did not use (left it empty):

badgerFileLoadingMode [optional]: can be set to FileIO (instead of the default MemoryMap) to avoid memory-mapping log files. This can be useful in environments with low RAM. Make sure to use badgerV2 as the database type if using this option.

    MemoryMap: default.
    FileIO: This can be useful in environments with low RAM

Needless to say, the default works fine as long as the DB does not get too big. In my case it was 4.7GB in size:

I find it impressive that the default of MemoryMapped worked that well on a 1 GB RAM machine, but I guess in the last days it stopped working.

The Fix

Starting step-ca manually worked with no error messages, but it used more and more memory. I downgraded from v0.23.0 to 0.17.2 as I upgraded some week ago, but it made zero difference. Finding the 4 GB db solved the problem: since the config and all secret keys/certificates are not in the DB, I tried to simply wipe it out, and that worked as expected: step-ca created a new DB. When started it used about 10% memory, and then even less. Back to normal.

Lesson I learned: watch your monitoring. This behavior started on 15th and it took me 3 days to realize.

OverTheWire – Security Wargames

I wish I had seen this a long time ago: https://overthewire.org/wargames/ are a set of challenges in the area of security: buffer overflows, command injection, web server security, plus fun Linux command line skills.

I learned a lot about how to detect and exploit buffer overflows and shellcode in the Narnia wargame. Good fun and educational too.

Natas is nice since it’s using a web server while the other ones use ssh. The harder ones are…hard, but there’s solutions all over the web in case you get stuck.

All in all, highly recommended to see how easy it is to exploit badly written code and how to write code which does not repeat those known security problems.

Twitter Does Not Like Me Anymore

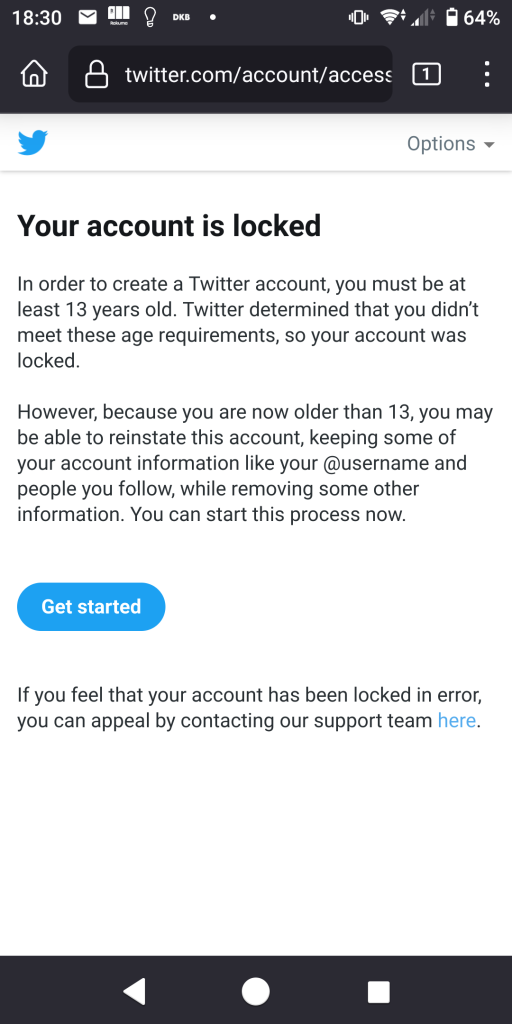
All the buzz about Twitter and Elon made me look at my Twitter profile. I saw the missing date of birth, so I added it. Now my account is locked:

Here I became less than 13 years old

I am quite confident I put in a 19xx year in there, so I should be at least 22 years old, but I cannot check that now since my account is locked.

At this point I wonder if I should care. At worst in 13 years I’ll get my access back. If you send me a message in Twitter, you might have to wait 13 years for a reply…

Update 2022-07-31: Well, they like me again. It seems I managed to become 13 quite fast:

And days later I aged enough to be over 13!

Yubikeys and SSH

About a year ago I found out that the Yubikey Neo can be used as a SmartCard which can keep a secret key on-board. You can also use an actual SmartCard if you have one. But the setup procedure is quite involved and you need gpg.

Yubikey to the rescue! Or maybe OpenSSH in this case: As this explains, most Yubikeys, including the cheap blue ones which can only do U2F or FIDO2, can work with OpenSSH 8.2 to provide the private key without storing the secret key unencrypted on disk. Similar to using a SmartCard, but much easier.

More important is that those keys are supported by GitHub since May 2021 and GitLab 14.8+ since March 2022.

Create a key:

❯ ssh-keygen -t ecdsa-sk
Generating public/private ecdsa-sk key pair.
You may need to touch your authenticator to authorize key generation.
Enter PIN for authenticator: 
You may need to touch your authenticator (again) to authorize key generation.
Enter file in which to save the key (/home/harald/.ssh/id_ecdsa_sk): 
Enter passphrase (empty for no passphrase): 
Enter same passphrase again: 
Your identification has been saved in /home/harald/.ssh/id_ecdsa_sk
Your public key has been saved in /home/harald/.ssh/id_ecdsa_sk.pub
The key fingerprint is:
SHA256:2xxxxxxxxxxxxxxxxxxxxxxxxxxxxxxxxxxxxxxxxx8 harald@m75q
The key's randomart image is:
+-[ECDSA-SK 256]--+
|            .ooo |
[...]
|      .*+ . .    |
+----[SHA256]-----+
❯ ls -la .ssh/id_ecdsa_sk*
-rw------- 1 harald users 626 Apr 11 20:35 .ssh/id_ecdsa_sk
-rw-r--r-- 1 harald users 224 Apr 11 20:35 .ssh/id_ecdsa_sk.pub

Once the public key part is added on the target system in its ~/.ssh/authorized_keys file, you can connect to it like this:

❯ ssh -i .ssh/id_ecdsa_sk t621.lan
Confirm user presence for key ECDSA-SK SHA256:2xxxxxxxxxxxxxxxxxxxxxxxxxxxxxxxxxxxxxxxxx8
Welcome to Ubuntu 21.10 (GNU/Linux 5.13.0-39-generic x86_64)
[...]
❯ 

Note that the private key ~/.ssh/id_ecdsa_sk is encrypted by the Yubikey, so this is a complete 2-factor authentication here, plus it checks for the user presence. And the maybe best part: that works on old U2F-only keys as well as new FIDO2 security keys. Love it!

Some FIDO2 keys can store the private key on the key directly which is convenient, but unfortunately less secure. Unlike SmartCards which have a limit for unsuccessful attempts, Yubikeys miss that feature for the U2F/FIDO2 part.

In case of errors…

I found 2 potential problems:

  • ssh-keygen failed with a “Key enrollment failed: invalid format”. If you run ssh-keygen with -vvv, you’ll see a line “debug1: sk_probe: 0 device(s) detected”. What this means is that /dev/hidrawX either does not exist or has the wrong permissions. Default is “0600” and owner is “root:root”.
    • Quick fix: sudo chmod a+rw /dev/hidrawX
    • Better fix: edit /lib/udev/rules.d/60-fido-id.rules and add a ‘, MODE=”0666″‘ to the line which starts with SUBSYSTEM==”hidraw”, then do a sudo udevadm control –reload and when you plug in the Yubikey, /dev/hidrawX will have 0666 permissions.
      You might need to install libyubikey-udev.
    • The above problem is likely only an issue when you do not use a graphical UI. If you log in via a graphical UI, all input devices should be owned by the logged in user.
  • Your OpenSSH version is older than 8.2. Check with “ssh -V”

What about ed25519-sk instead of ecdsa-sk?

ed25519-sk is only supported by FIDO2 Yubikeys keys and possibly not even all of them do depending on the firmware version.

U2F on the CLI

U2F works well and easily via a web browser, but you can also use it directly on the command line. You “just” have to implement the USB protocol part of U2F, namely talk to /dev/hidrawX.

u2fcli did that and it worked on my R2S (ARMv8):

harald@r2s2:~/git$ git clone git@github.com:mdp/u2fcli.git
Cloning into 'u2fcli'...
remote: Enumerating objects: 57, done.
remote: Total 57 (delta 0), reused 0 (delta 0), pack-reused 57
Receiving objects: 100% (57/57), 19.26 KiB | 1.20 MiB/s, done.
Resolving deltas: 100% (21/21), done.
harald@r2s2:~/git$ cd u2fcli
harald@r2s2:~/git/u2fcli$ go mod init u2fcli
go: creating new go.mod: module u2fcli
go: to add module requirements and sums:
        go mod tidy
harald@r2s2:~/git/u2fcli$ go mod tidy
go: finding module for package github.com/flynn/u2f/u2ftoken
go: finding module for package github.com/flynn/hid
go: finding module for package github.com/mdp/u2fcli/cmd
go: finding module for package github.com/flynn/u2f/u2fhid
go: finding module for package github.com/spf13/cobra
go: found github.com/mdp/u2fcli/cmd in github.com/mdp/u2fcli v0.0.0-20180327171945-2b7ae3bbca08
go: found github.com/flynn/hid in github.com/flynn/hid v0.0.0-20190502022136-f1b9b6cc019a
go: found github.com/flynn/u2f/u2fhid in github.com/flynn/u2f v0.0.0-20180613185708-15554eb68e5d
go: found github.com/flynn/u2f/u2ftoken in github.com/flynn/u2f v0.0.0-20180613185708-15554eb68e5d
go: found github.com/spf13/cobra in github.com/spf13/cobra v1.2.1
harald@r2s2:~/git/u2fcli$ go build
harald@r2s2:~/git/u2fcli$ ls
cmd  go.mod  go.sum  LICENSE  main.go  README.md  u2fcli

Permissions for /dev/hidrawX needs to be given:

harald@r2s2:~/git/u2fcli$ sudo chmod a+rw /dev/hidraw0

And now a full cycle of register (once), sign+verify (log in):

harald@r2s2:~/git/u2fcli$ ./u2fcli reg --challenge MyComplexChallenge --appid https://test.com
Registering, press the button on your U2F device #1 [Yubico Security Key by Yubico]{
  "KeyHandle": "-374aUcG7iWqVc5rsX8jE_8yr1iS-EEDdt106-CAKec90Gg1VVK9dv5E_JmZRIyKVaas9vhLVHb7zbbJ6rNltg",
  "PublicKey": "BHBwVKLRYZZKZGaL96FQtzis8i01M2DMw4IQwuMIKbWa2dZJSC1GlXlYiWhycig4R3DdlipdR675o_e4QfpI-UU",
  "RegisteredData": "-374aUcG7iWqVc5rsX8jE_8yr1iS-EEDdt106-CAKec90Gg1VVK9dv5E_JmZRIyKVaas9vhLVHb7zbbJ6rNltjCCAr4wggGmoAMCAQICBHSG_cIwDQYJKoZIhvcNAQELBQAwLjEsMCoGA1UEAxMjWXViaWNvIFUyRiBSb290IENBIFNlcmlhbCA0NTcyMDA2MzEwIBcNMTQwODAxMDAwMDAwWhgPMjA1MDA5MDQwMDAwMDBaMG8xCzAJBgNVBAYTAlNFMRIwEAYDVQQKDAlZdWJpY28gQUIxIjAgBgNVBAsMGUF1dGhlbnRpY2F0b3IgQXR0ZXN0YXRpb24xKDAmBgNVBAMMH1l1YmljbyBVMkYgRUUgU2VyaWFsIDE5NTUwMDM4NDIwWTATBgcqhkjOPQIBBggqhkjOPQMBBwNCAASVXfOt9yR9MXXv_ZzE8xpOh4664YEJVmFQ-ziLLl9lJ79XQJqlgaUNCsUvGERcChNUihNTyKTlmnBOUjvATevto2wwajAiBgkrBgEEAYLECgIEFTEuMy42LjEuNC4xLjQxNDgyLjEuMTATBgsrBgEEAYLlHAIBAQQEAwIFIDAhBgsrBgEEAYLlHAEBBAQSBBD4oBHzjApNFYAGFxEfntx9MAwGA1UdEwEB_wQCMAAwDQYJKoZIhvcNAQELBQADggEBADFcSIDmmlJ-OGaJvWn9CqhvSeueToVFQVVvqtALOgCKHdwB-Wx29mg2GpHiMsgQp5xjB0ybbnpG6x212FxESJ-GinZD0ipchi7APwPlhIvjgH16zVX44a4e4hOsc6tLIOP71SaMsHuHgCcdH0vg5d2sc006WJe9TXO6fzV-ogjJnYpNKQLmCXoAXE3JBNwKGBIOCvfQDPyWmiiG5bGxYfPty8Z3pnjX-1MDnM2hhr40ulMxlSNDnX_ZSnDyMGIbk8TOQmjTF02UO8auP8k3wt5D1rROIRU9-FCSX5WQYi68RuDrGMZB8P5-byoJqbKQdxn2LmE1oZAyohPAmLcoPO4wRgIhANIZ7Q_cty_UkWigyQ7Ot0pC0egyI_eSUJ52Hge95vz1AiEAzf7hX_XvNQvoPQ2IvjgJjUkV3wvDPctkac2Z_8fRaik"
}

harald@r2s2:~/git/u2fcli$ ./u2fcli sig --appid https://test.com --challenge SomethingElse --keyhandle "-374aUcG7iWqVc5rsX8jE_8yr1iS-EEDdt106-CAKec90Gg1VVK9dv5E_JmZRIyKVaas9vhLVHb7zbbJ6rNltg"
Authenticating, press the button on your U2F device
{
  "Counter": 50,
  "Signature": "AQAAADIwRQIhALlZyMmormC2b9JCaOXYAdKq4wvpdKg4wMu68fLgXmclAiADDHbFxKrm5eYCoCvC-m1vEEegXzWHfwuPLpUh81qHoA"
}

harald@r2s2:~/git/u2fcli$ ./u2fcli ver --appid https://test.com --challenge SomethingElse --publickey "BHBwVKLRYZZKZGaL96FQtzis8i01M2DMw4IQwuMIKbWa2dZJSC1GlXlYiWhycig4R3DdlipdR675o_e4QfpI-UU" --signature "AQAAADIwRQIhALlZyMmormC2b9JCaOXYAdKq4wvpdKg4wMu68fLgXmclAiADDHbFxKrm5eYCoCvC-m1vEEegXzWHfwuPLpUh81qHoA"
Signature verified